When you insert the pen drive on your PC then you will see the default icon. But you can change the pen drive icon easily. If you add your brand logo and client logo on your pen drive icon then its look like more professional. When I tried to add my favorite icon on the pen drive then I can’t do it easily. After that, I tried to find out the solution and after a few minutes, I find the solution. Today I will share you the two easy solutions to add pen drive icon from your computer.
Pen drive is one of the most popular devices to keep your data on it and you can transfer on other computer and laptop easily.
Method 1: How to Change the Pendrive Icon
Download Icon from the Internet
1. Open a web browser on your computer.
2. Type the web address bar Google.com and hit Enter button.
Perfect icon size is 34 pixels square for your pen drive.
- Type the Google search bar “34 pixels square icon format” and click the Google search button.
- Click the “34 pixels square icon format” text to see more icon.
- Find your favorite icon from this page. Click the up to the image icon.
- Then you will see this icon image with a blank background. Right-click up to the image and select the Save image as menu.
- Type the image name in front of the File name box. I have typed the image name howtoway. Make sure this image Save as type is Icon. Press the Save button.
3. After that this image will download on your computer. You will find this image in your computer download folder. Now minimize or close your internet browser.
Add Pen Drive Icon on Your Removable Drive
1. Plugin the pen drive into your PC USB port.
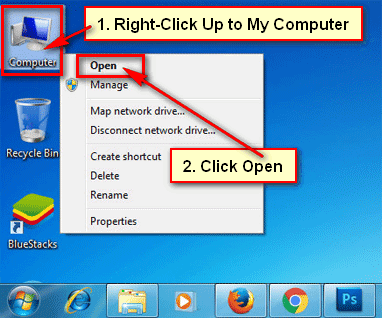
2. Right-click the My Computer/My PC with computer icon and select the Open menu to open your computer all drives.
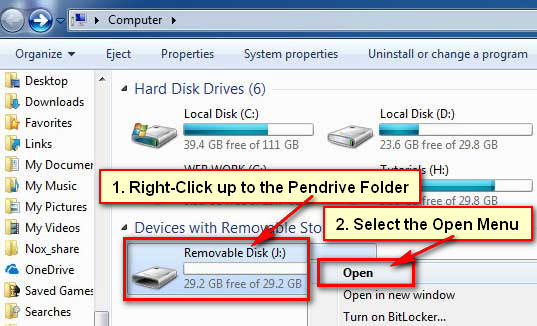
3. You will see your pen drive folder into this list. Right-click the pen drive folder and select the Open to open the pen drive folder. If you did not change your pen drive name then it’s default name will Removable Disk.
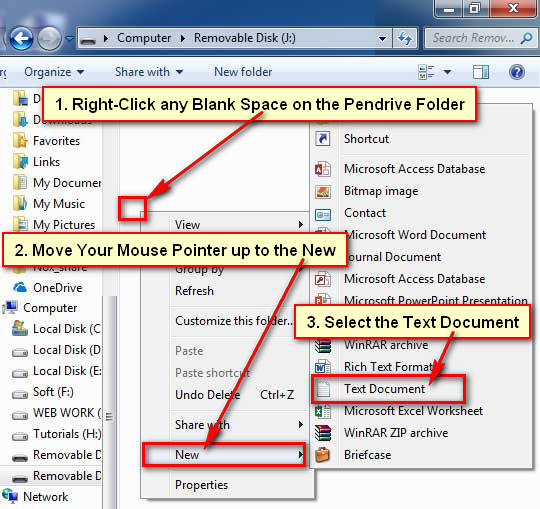
4. Right-click any blank space on your pen drive folder. Go to the New and select the Text Document menu.
5. Double click the New Text Document to open it.
- Type the [AutoRun] into the First line.
- Input the label=My USB Drive into the second line.
- Type the ICON=howtoway.ico into the third line. I typed this line howtoway.ico because my image name is howtoway. In this place type your own image name.
You can copy and paste this code from below:
[AutoRun]
label=My USB Drive
ICON=howtoway.ico
6. Click the File menu and select the Save As sub-menu.
- Write the File name box AUTORUN.inf and select the Save as type All Files. Press the Save button.
- After that close the note pad window.
6. Right-click the My Computer/My PC and select the Open.
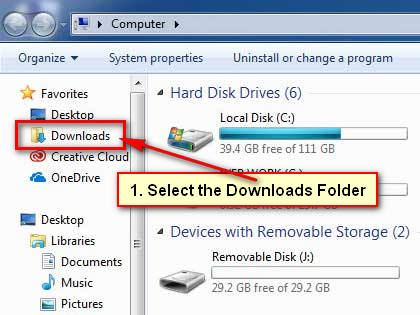
7. Scroll up or down and click the Downloads folder. Here you will find your recently downloaded icon image.
- Right Click the image and select the Copy menu.
- Scroll-down using the scroll bar and select your pen drive folder. Its default name is Removable Disk.
- Click the mouse right button up to the blank space and select the Paste menu.
8. All you have done. Just unplug or disconnect your removable or pen drive from your computer and plug or connect it again on your computer.
Open your My Computer/My PC and see your pen drive icon. Using this way, you can add any icon format image on your removable drive.
Method 2: How to Add Your Own Photo on Pen Drive Icon
1. Open your photo folder on your computer. Right-click up to your photo which you want to add on your pen drive and select the Edit menu.
2. Your selected photo will open on the Paint tool.
Click the upper-left corner blue color with the down-arrow icon. Move your mouse pointer up to the Save as menu and select the BMP picture to save this image on BMP format.
Type your picture name on the File name box.
Press the Save button.
3. You will find the recently created image into this folder.
Press the mouse-right button up to this image and select the Copy menu.
4. Connect your pen drive into the USB port.
Open your My Computer with all drivers. Select the pen drive folder its default name Removable Disk.
Right-click the blank space and select the Paste menu.
You will see your select image into this folder.
5. Right-click the blank space, go to the New and select the Text Document menu.
6. Double click the New Text Document to open it.
7. Type the [autorun] into the first line.
Input the icon = pendrive.bmp into the second line.
You can copy and paste this code from here:
[autorun]
icon = pendrive.bmp
Tips: Remember that you need to type the same name as your pen drive image in front of the icon text.
Press the File menu and select the Save As sub-menu.
Type the autorun.inf into the File name box.
Select the All files on the Save as type arrow icon.
Hit the Save button to save this file on the pen drive.
8. Disconnect your pen drive from your PC USB port and connect it again.
After that, you will see the recently added image on the pen drive. Using the same way, you can add any image on your pen drive.
If you have any problem to change the pen drive icon then please don’t hesitate to leave a comment.
